Do you love capturing adorable moments of your furry friends on camera? Maybe you've got a knack for snapping pics of your pets doing silly things or looking cute. It's time to take your pet photography game to the next level by creating your pet photography studio! Don't worry, you don't need a fancy studio with all the bells and whistles. We have 10 simple and budget-friendly DIY setup ideas to help you get those perfect shots or dog-gone good pictures. So, grab your camera, and let's get started!
1. Find the Right Space
Finding the right space for your pet photography adventures is crucial. The ideal spot should be quiet, well-lit, and spacious enough to move around comfortably. While it doesn't have to be a separate room, a corner of your living room or a dedicated space in your home can work wonders.
Ensure you have easy access to natural light, as it's your best friend in pet photography. If possible, position your setup near a big window to take advantage of the soft, diffused light it provides.
2. Choose a Backdrop
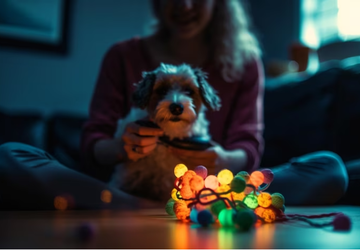
A clean and simple backdrop can make your pet photos pop. You can go for a professional look by investing in a backdrop stand and rolls of seamless paper in various colors. However, if you're on a budget, don't fret. You can achieve great results with bedsheets, curtains, or a plain wall. Just make sure your chosen backdrop is easy to clean in case your furry models decide to leave their mark.
3. Lighting Matters
When it comes to pet photography, lighting is your best friend. While natural light is often the most flattering, it's not always readily available. In these situations, consider investing in some affordable softbox lights. These lights help create soft, even lighting that will make your pet's features shine.
Using natural light, make the most of it by positioning your pet and camera near the window. Experiment with different angles to see where the light works best.
4. Set up a Pet-Friendly Zone
Creating a comfortable and pet-friendly zone is essential for a successful photoshoot. Lay down cozy blankets or pet beds, ensuring your pets have a comfortable, relaxing place. Their favorite toys and treats are nearby to keep them happy and distracted during the shoot. A content pet makes for better photos!
5. Camera and Lens
You don't need to break the bank on a high-end camera to start your pet photography studio. A good DSLR or smartphone with a decent camera will do the trick. Experiment with different lenses to see which one works best for your style. For playful shots, a wide-angle lens can capture more of the action, while a portrait lens can create stunning close-ups.
6. Tripod for Stability
Steady hands are great, but a tripod is even better. It ensures your photos are sharp and blur-free, especially when using slower shutter speeds or shooting in low-light conditions. Look for a sturdy and adjustable tripod to get the perfect angle.
7. Props and Accessories
Get creative with props and accessories to add personality to your pet photos. Scarves, hats, or even simple bows can make your pet stand out and give your photos extra flair. However, always prioritize your pet's comfort. Make sure they're at ease with the props and accessories you choose.
8. Patience and Treats
Patience is a virtue in pet photography. Pets don't always cooperate, but that's part of what makes them so endearing! Have plenty of treats to reward good behavior and keep your pet engaged. Take breaks if needed, and never force them into uncomfortable poses. The key is to capture their natural charm.
9. Post-Processing Software
After the photoshoot, you can enhance your pet portraits using post-processing software. There are plenty of free and user-friendly options like GIMP or Canva available. Adjust the brightness, contrast, and colors to make your pet's fur shine and correct any minor imperfections.
Don't overdo it, though. The goal is to enhance, not transform, your pet's natural beauty.
10. Safety First
Last but certainly not least, ensure your pet's safety throughout the entire photography process. Avoid using any harmful chemicals or materials that could harm your pet. Be cautious with high surfaces, and never leave your pet unattended during the shoot. Their safety and comfort should always be your top priorities.
Working with Pets During a Photoshoot
Now that you have your DIY pet photography studio all set up, it's time to tackle the fun but sometimes unpredictable part – working with your furry models. Here are some tips to help you get the best shots while keeping your pets comfortable and happy:
Exercise Before the Shoot
Before diving into a photoshoot, allow your pets to burn off some energy. Take them for a walk or play their favorite games to help them release any excess excitement. A tired pet is more likely to stay still and cooperate during the shoot.
Be Patient
Patience is essential when working with animals. Pets don't always understand what you want them to do, so it's crucial to remain calm and patient. Allow them time to get used to the new environment and equipment.
Use Treats and Positive Reinforcement
Treats can be powerful motivators for pets. Use them as rewards for good behavior or to lure your pet into the desired position. Treats can help maintain your pet's attention and make the photoshoot a positive experience.
Get on Their Level
For captivating shots, get down to your pet's eye level. This perspective creates a more intimate and engaging connection between the viewer and the pet. It also helps you capture their unique expressions and personalities.
Conclusion: Paw-some Pet Photography
In conclusion, setting up your pet photography studio can be a rewarding and fun experience. You don't need a huge budget or fancy equipment – just some creativity, patience, and a whole lot of love for your furry friends.
With these 10 DIY setup ideas, you'll be well on your way to capturing adorable moments you and your pet can cherish forever. So, unleash your inner pet photographer, and let the cuteness shine through your lens! Happy snapping!
-
Top 10 Purr-fect Cat Cafes in Europe: Feline-Friendly Dining Spots
Hey there, cat lovers and foodies! Are you ready to embark on a whisker-twitching adventure through some of Europe's most perfect cat cafes? We're about to take you on a tour of the continent's top spots where you can sip your favorite brew and cuddle with adorable cats. These cafes are like heaven on Earth for cat enthusiasts. So, grab your favorite feline-loving friend, and let's dive right in!
-
The Rise of Tech-Forward Drinks and Smart Cocktail Systems
Welcome to the era of tech-forward drink innovations and innovative cocktail systems. With the rise of drink-making technology, the days of waiting for a bartender to mix your drink might be numbered; intelligent machines craft cocktails with precision and creativity. These innovations are not only about convenience but also about delivering a unique and personalized drinking experience. Let's explore how these tech trends are transforming the beverage industry.
-
Where to Source Wild Foraged Ingredients
Foraging for wild ingredients can be an esoteric and enriching activity, not solely because of the unparalleled freshness of the ingredients but also because of the adventure inherent in the quest. This compendium will elucidate the essentials of a wild foraging guide, the best foraged foods, and wild ingredients recipes that will elevate your culinary repertoire. Whether you're a neophyte or a seasoned forager, this article will offer invaluable insights into sourcing and utilizing wild ingredients.