Have you ever craved sushi but didn’t want to spend a fortune at a restaurant? Maybe you’ve thought about making it at home but assumed it was too complicated. The truth is, with the right ingredients, tools, and techniques, you can make sushi that’s just as good—if not better—than what you’d get at a sushi bar.
Homemade sushi isn't just a way to save money. It's also an opportunity to get creative and experiment with different flavors. Plus, there's something incredibly satisfying about rolling your sushi and enjoying the results. Whether you're a fan of classic rolls, sashimi, or hand-pressed nigiri, this guide will walk you through the entire process.
Getting the Right Ingredients
Sushi is all about freshness and balance. The better your ingredients, the better your sushi will taste.
Choosing the Best Fish

Not all fish is safe to eat raw. If you’re using seafood, make sure it’s sushi-grade, which means it has been frozen at extremely low temperatures to kill any harmful parasites. You can find sushi-grade fish at specialty seafood markets or high-quality grocery stores.
Some of the best fish for sushi include:
• Salmon – Rich, buttery, and one of the most popular choices.
• Tuna – Comes in different varieties, like bluefin and yellowfin, offering deep, meaty flavors.
• Yellowtail (Hamachi) – Smooth texture with a slightly sweet taste.
• Shrimp (Ebi) – Usually cooked and lightly sweet.
• Imitation Crab (Kani) – Often used in California rolls, a budget-friendly option.
Not a fan of raw fish? No problem! There are plenty of other ingredients that work well in sushi. Cooked shrimp, grilled eel, tempura-fried veggies, and teriyaki chicken all make fantastic fillings.
Making the Perfect Sushi Rice
Sushi rice isn’t just regular rice—it’s what holds everything together. To get it right:
1. Use short-grain Japanese rice (like Nishiki or Kokuho Rose). It’s stickier and has the right texture.
2. Rinse the rice several times to remove excess starch. This keeps it from becoming too gummy.
3. Cook the rice according to the package instructions. A rice cooker makes this process foolproof.
4. While the rice is still warm, gently fold in a mixture of:
o Rice vinegar – Adds the signature tangy flavor.
o Sugar – Balances the acidity.
o Salt – Enhances the taste.
Let the rice cool to room temperature before making sushi. It should be slightly sticky but not mushy.
Essential Sushi Fillings and Toppings
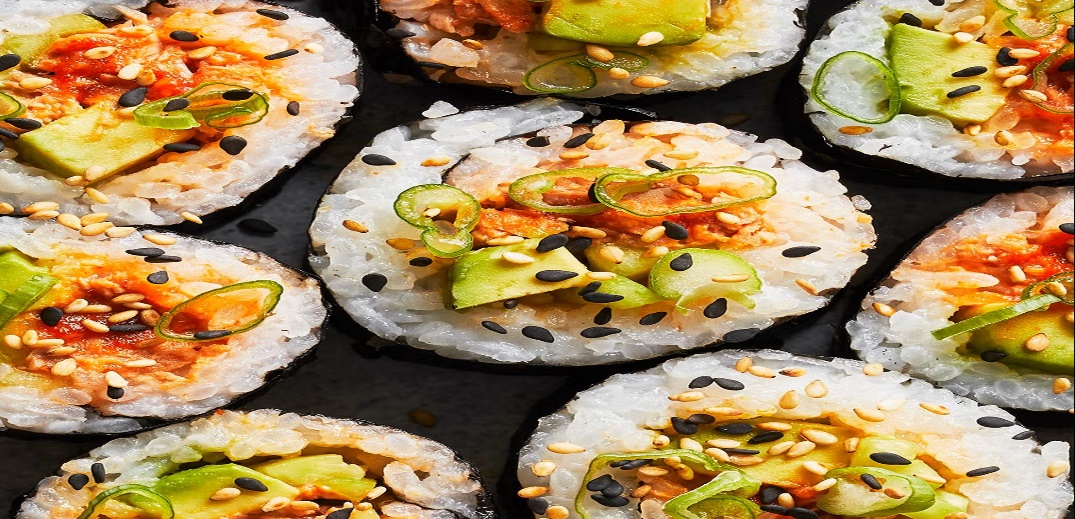
Sushi isn’t just about fish and rice—the right combination of fillings and toppings makes each roll unique. Crunchy and refreshing cucumber adds texture, while creamy avocado pairs beautifully with seafood. Pickled radish brings a slightly sweet and tangy contrast. Spicy mayo, a blend of mayonnaise and sriracha, adds a touch of heat. Sesame seeds and tobiko (fish roe) enhance both crunch and visual appeal, making every bite more exciting.
Sushi-Making Tools You’ll Need
You don’t need a professional kitchen to make sushi, but a few tools will make the process easier:
Bamboo Rolling Mat (Makisu)
Helps shape the rolls evenly.
Sharp Knife
A dull knife will tear the sushi instead of slicing it cleanly.
Plastic Wrap
Prevents rice from sticking to the mat.
Rice Paddle
Helps spread the rice without crushing it.
If you don’t have a bamboo mat, you can roll sushi using a clean dish towel or parchment paper.
How to Roll Sushi Like a Pro
Now comes the fun part—assembling and rolling your sushi!
How to Make a Classic Sushi Roll (Maki)
1. Lay out a sheet of nori (seaweed) on the bamboo mat, rough side facing up.
2. Spread a thin layer of rice over the nori, leaving about an inch of space at the top. Wet your hands to prevent sticking.
3. Add your fillings in a straight line near the bottom.
4. Start rolling from the bottom, using the bamboo mat to press gently as you go.
5. Seal the roll by moistening the edge of the nori with water.
6. Slice into even pieces with a wet knife for clean cuts.
If you want to make an inside-out roll (like a California roll), flip the nori over so the rice is on the outside before adding fillings.
Making Hand-Pressed Sushi (Nigiri)
Nigiri is one of the easiest types of sushi to make. Here’s how:
1. Wet your hands to keep the rice from sticking.
2. Shape a small amount of rice into an oval.
3. Place a slice of fish on top and gently press it down.
4. Add a touch of wasabi or a brush of soy sauce for extra flavor.
Pro Tips for Restaurant-Quality Sushi
Even if you follow every step correctly, these extra tips will take your sushi to the next level:
Use fresh fish
The quality of your seafood makes a huge difference.
Keep a bowl of water nearby
Wet hands keep the rice from sticking.
Don’t overfill rolls
Too many ingredients make rolling difficult.
Use a wet knife
A damp blade makes slicing much easier.
Chill your sushi for 5 minutes before slicing
This helps it hold its shape.
Want to go the extra mile? Serve sushi with pickled ginger, wasabi, and soy sauce on the side—just like at a real sushi bar.
Experimenting with Different Sushi Creations
Once you’ve mastered the basics, you can get creative with your sushi. Try these fun variations:
Spicy Tuna Rolls
Mix diced tuna with spicy mayo for a kick.
Tempura Rolls
Add crispy tempura shrimp for crunch.
Rainbow Rolls
Top a California roll with different sashimi slices for a colorful look.
Vegetarian Sushi
Use roasted bell peppers, sweet potato, or grilled mushrooms for a meat-free option.
Dragon Rolls
Fill with tempura shrimp and top with thinly sliced avocado for a dramatic look.
Sushi-making is more than just a recipe—it’s an experience. Play around with different ingredients, textures, and presentations to make each roll unique.
Bringing the Sushi Bar Home
Making sushi at home might seem intimidating at first, but once you get the hang of it, it’s fun, rewarding, and much more affordable than dining out. Plus, homemade sushi allows you to customize each roll exactly how you like it.
Whether you’re preparing a sushi night for friends, treating yourself to a fancy dinner, or simply learning a new skill, you don’t need a restaurant to enjoy high-quality sushi. Now, grab your ingredients, roll up your sleeves, and start making sushi like a pro!
-
How to Train Your Rabbit to Jump Through Hoops
So, you've got a cute little rabbit and a set of hoops, and you're thinking, "Wouldn't it be awesome if my bunny could jump through those hoops?" The idea of your fluffy friend soaring through the air is not just a whimsical dream – it's an achievable reality!
-
Where to Find the World’s Most Unique Eateries
When you think of dining, what comes to mind? Is it just about satisfying the palate, or is it an adventure waiting to be embarked upon? For those who seek the extraordinary, the hidden global eateries and unique dining experiences offer a world beyond your wildest culinary dreams. Let's journey through some of the world's top food destinations to uncover their magic.
-
Top 10 Tips for a Successful Aquarium
Setting up and maintaining a successful aquarium might seem daunting, but fear not! You can create a thriving aquatic haven with a few simple tips and a splash of enthusiasm. Let's dive into the basics with a laid-back and straightforward approach.